


Three Dimensional Triangles
- Holli Kalina
- Oct 27, 2024
- 4 min read
Updated: Nov 10, 2024
Origami
Inspired by my earlier paper folding experiments where I created a Turkish Map Fold Zine, I have continued using Origami to create three-dimensional paper models. Similarly, I wished to continue with the same theme as used for my zine, the use of the triangle as a binary gender identifier.
Origami is the Japanese art of paper folding, but it has also been used for creative expression by other artists. Manal Mohammadi Taha Al-Adawi documents in her paper Origami as a Sculptural Art in Textile Printing Design how textiles can be transformed using origami techniques into three-dimensional textile pendants (Al-Adawi, 2015)

Textile Origami by Manal Mohammadi Taha Al-Adawi
The most commonly recognised three-dimensional geometric shapes that have triangular characteristics are the tetrahedron and the square pyramid. Both incorporate triangular sides, however, the former has just three sides, making it appear triangular from all angles, whilst the latter includes four sides and has a square base. It is the square-based version that one often thinks of when visualising a pyramid, with recollections of the Great Pyramids of Giza, or the glass pyramid of the Louvre in Paris. For this exercise, I decided to recreate the square-based pyramid on paper.

The Glass Pyramid at the Louvre, Paris
I found a design on YouTube, on Jenny Chan’s channel Origami Tree (Chan, 2018). Chan uses the pyramid design to create a small gift box, tying the top of the pyramid with ribbon to hold the finished item together. The concept of a pyramid that one could open to reveal something enclosed within harmonised with the ideas explored in my zine exercise.
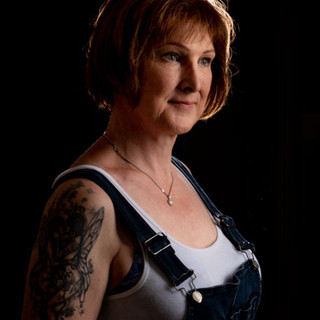
I wanted my pyramids to have designs on the outside that reflected the theme of gender, particularly that of feminine genders, as the pyramid looks like a three-dimensional upward-pointing triangle. I used images from previous portrait work to cover the outside surfaces. Using Photoshop I initially masked off the areas of the image that would not be on the outside surfaces. This required transposing measurements from a plain, folded, template onto the Photoshop image.
From initial tests with the printed design, I decided that I needed more imagery so that when the pyramid was opened there would be more interest. I used a second image as a layer under the outside image so that the remainder of the sheet was covered. This worked far better, so I experimented with different main images and backgrounds to create a set of six pyramids.
What went well was that as the paper folded parts of the model's face became displaced, which I felt reflected the facets of female identity. Despite the stability and strength suggested by a pyramid structure, the paper's fragility symbolised the vulnerability that many women experience at different times in their lives. The fragmented shapes were also unsettling and might evoke feelings of trauma for some. The ability of the pyramids to be opened aligned further with the concept of identity, where the true self is often hidden behind one's social facade.

Example of a Photoshop image before folding
How to fold an Origami Pyramid
AL-ADAWI, M., (2015). 'Origami as a Sculptural Art in Textile Printing Design', International Design Journal, 5(2), pp. 283-289. doi: 10.21608/idj.2015.101401
CHAN, J., 2018. DIY Gift Box - How to Make A Pyramid Gift Box Tutorial - Gift Wrapping Idea [Viewed 27/10/2024]. Available from: https://www.youtube.com/watch?v=A-ctI-GKblY
HANSON, R. M., 1995. Molecular Origami | Precision Cale Models From Paper. California: University Science Books
Digital Manipulation
Pyramids create eye-catching and impressive architecture. As mentioned above two examples are the Louvre and the Great Pyramids of Giza, additionally, The Shard in London is a pyramid-like design. For this exercise, I wanted to investigate using a Photoshop displacement filter and a pre-generated pattern to wrap iconic buildings.
I used found images of the Shard and the Ancient Pyramids for the base image. I used an existing portrait to create a bespoke repeating pattern with which to wrap the building.
To create the repeating pattern I opened the image in Photoshop and cropped it to a square format, reducing the negative space as much as possible.
I reduced the image size to 2.5cm square whilst keeping the resolution at 300ppi and once I had resized it I saved it as a pattern, using the menu edit/define pattern option.
I then created a blank canvas with a transparent background to the same dimensions as the base image and used the menu option fill/pattern to fill it with the design

I further distorted the image, in order to provide a perspective effect later in the process, using the menu option edit/transform/distort.

To create a displacement mask I followed the steps originally learned during my foundation year at Solent (Earley, 2020) including:
· Select and mask the building to be wrapped
· Desaturate the building layer using a black-and-white adjustment
· Increase the contrast of the building layer using a levels adjustment and a curves adjustment
· Apply a slight Gaussian Blur using a filter
· Save a copy of the image using a name that can be identified as a displacement mask

Example Displacement Mask
On the base image, I used the history feature to return to the point before the Gaussian blur was applied at which point I was ready to apply the wrap, by following the following steps:
· Open the wrap file (from the previous step section) and apply it to the image, over the top of the desaturated building layer.
· Copy the mask from the building layer onto the wrap layer using Alt-drag on the layers panel
· Select the wrap layer and add a distort filter, selecting the displacement option from the menu.
· Choose a horizontal and vertical displacement value around 20, this will vary depending upon the effect required and the resolution/scale of the image.
· At the prompt, select the pre-saved displacement mask and apply the filter.


The settings may require adjustment, which is basically trial and error until the results are acceptable. The new displacement layer can be adjusted for colour, contrast, exposure, etc. to blend with the base image. On the Shard image, I also applied a sky replacement edit as the original sky was a plain blue.
EARLEY, L., n.d. Displacement Maps Using Photoshop. Lecture delivered to Photography with Foundation, level 3, 2020.


Comments