


Screen Printing Workshop
- Holli Kalina
- Nov 3, 2024
- 4 min read
Screen printing is a process where ink is forced through a fine mesh screen onto a surface. Screens were originally made of silk, hence why the process is also referred to as silk screen printing. The screen consists of a wooden or metal frame, upon which a fine mesh is stretched. The mesh is produced in differing mesh counts from typically 45 threads per centimetre, for printing on fabric, to around 120 or higher for printing on flatter materials such as paper. How Thread Counts are interpreted varies between the UK and the USA. In the UK the thread count is measured in metric (per square centimetre) and the count number is suffixed T. e.g. 45T or 90T. In the US the thread count is based on imperial measurements (inches) and has no suffix. e.g. 230 (Screenprintw, 2022).

At Solent Uni we use thread counts of 45 for printing on fabric and 90 for printing on paper. The higher the thread count the greater the risk of damage to the mesh as the individual threads are finer and more susceptible to breaking. The website Screen Printing World states:
“The mesh count screen printers use changes depending on the level of detail in a design and the thickness of ink used. Images with high detail should use screens with a higher mesh count. Those fine dots of detail will fall through the holes in low mesh count screens” (Ibid, 2022).
The screen printing process uses a positive image to reveal holes in the mesh where printing ink can be forced through onto the printing media. To prepare the mesh a black and white image is printed onto a transparent media, often acetate, and this image is then used to mask a screen which has been coated with a light-sensitive emulsion. When it is exposed to strong UV light, the black parts of the image mask the UV light whilst the clear elements of the image allow light to pass through, fixing the light-sensitive emulsion to the screen.
Once exposed, the screen is thoroughly washed. The emulsion on the masked areas can be washed away leaving the areas that need to be printed porous to printing ink. The prepared screen is then mounted onto a printing table via hinged arms, that allow the screen to be raised and accurately lowered into the same position on the table. Then the fun begins.

The printing process involves printing ink being repeatedly dragged across the screen in a smooth motion under even pressure. The first movement primes the exposed mesh with ink, and the second transfers the ink contained in the mesh onto the media. This process is repeated to create more prints. It is possible to print in full colour, either by masking areas that need to be different colours or creating separate screens for each colour and aligning the previously printed media exactly with the new screen. Alignment of the media and screen is a vitally important part of screen printing technique.
Screen printing is often blocks patterns or text, but it is possible to recreate a photographic look by using a technique known as Halftone. Halftone is a printing technique created in the 20th century to enable the printing of shades and colours. The tones and shades are created using dots of differing sizes, where large dots would be darker tones, and smaller dots would be lighter. Newspaper printing used halftone to reproduce images in their newspapers.

This exercise was a workshop, where the entire class created a screen print together. Before the workshop, I sent the print department a test image for printing on acetate. Which I created by converting a black-and-white photograph to a halftone. This image was then added to others from the rest of the class to make three acetates and then three large screens for printing. Because the group was fairly large we worked in teams creating screen prints in a variety of colours. We experimented with overlaying prints to get an abstract effect. The results were changeable, some worked but many did not.
The objective of the workshop was to learn/refresh a basic knowledge of the screen printing process, and this was achieved. It was also a lot of fun.
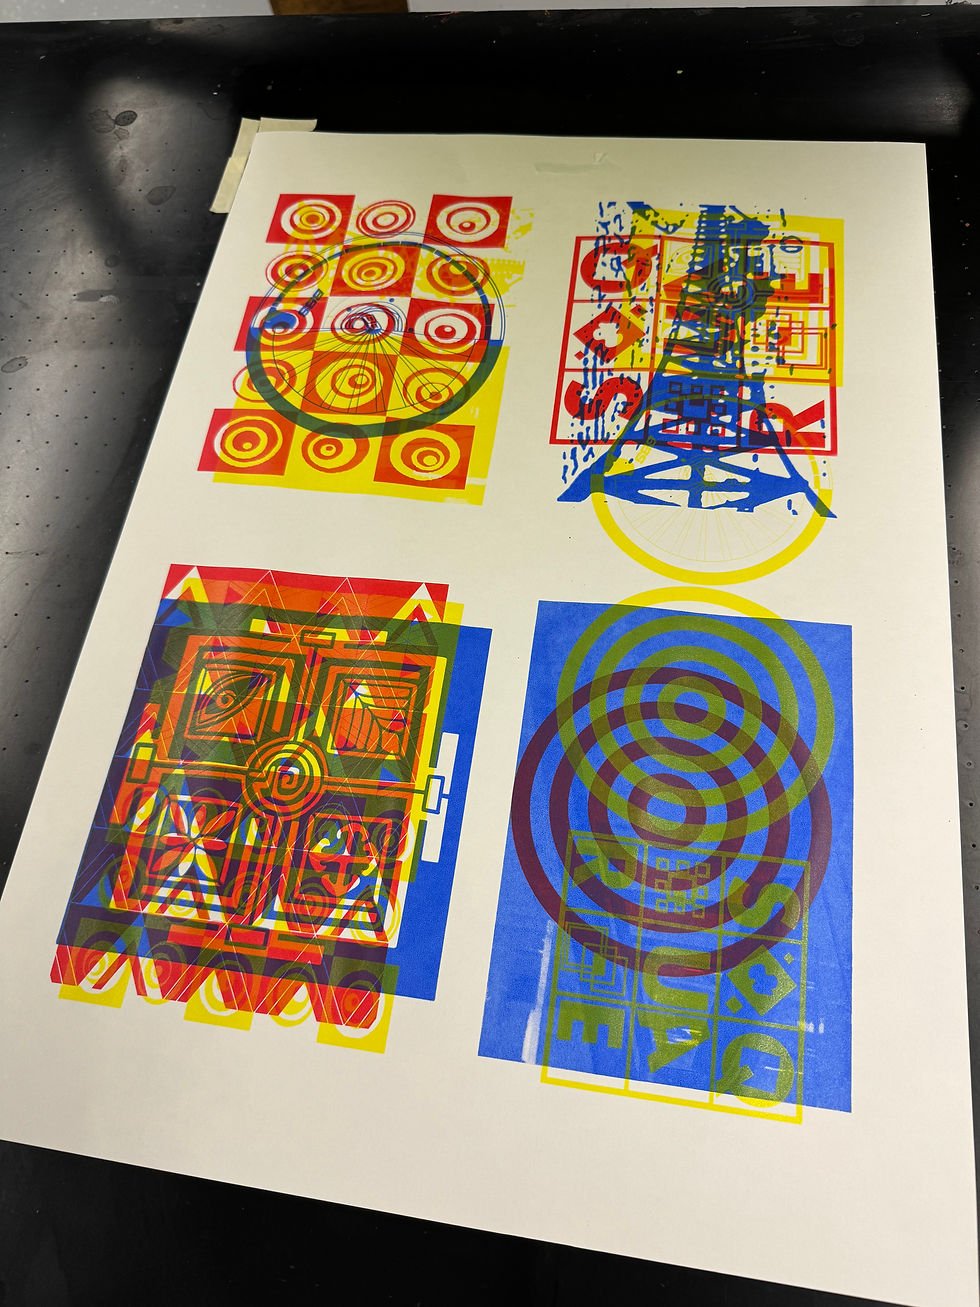

My test print was not very successful. I was the only person to attempt half-tone, which would normally use a slightly different viscosity of printing ink. I also did not appreciate when making the halftone image that the dot size needs to be matched to the final image size and the thread count of the screen with which it is to be printed. As a result, my prints were often too dark, where too much ink had transferred to the paper. Following on from the workshop I have researched the correct settings for printing halftones.
The rule of thumb is to divide the thread count of the screen US Value) by 5 to give you the Lines Per Inch (LPI) that need setting in editing software when creating the halftone image. For greater detail, this could be reduced to 4. The US equivalent of 90T thread count is 90 X 2.54 = 228. Therefore to print a halftone image with detail on a 90T thread screen the LPI should be 57.
Another setting for halftone is the Angle. Jocelyn Wedman of Screenprinting.com recommends an angle of 22.5 degrees, explaining their recommendation as:
“Dots that fall at right angles on the screen (0°, 90°, 180°, and 270°) will line up with the threads of the mesh and won’t be printable. Angles at 45° will hit the knuckles of the mesh diagonally. You’ll lose much detail when using a 45° angle. For best results, use an angle that bisects the mesh, so the dots miss as many threads and knuckles as possible. A good rule of thumb is to use 22.5° angles. This way, the dots aren’t falling on the threads or knuckles of the mesh, but between them” (Wedman, 2023).
SCREENPRINTW, 2022. The differences in screen printing mesh count? [Viewed 03/11/2024]. Available from: https://screenprintworld.co.uk/the-differences-in-screen-printing-mesh-count/
WEDMAN, J., 2023. A Crash Course in Halftones for Screen Printing [Viewed 03/11/2024]. Available from: https://www.screenprinting.com/blogs/news/a-crash-course-in-halftones-for-screen-printing


Comments